Christmas Crafts: Advent Calendar part 2

Materials used: felt in three different colour, old fabric we had in the house, non toxic fabric glue, scissors, thread and needle, glitter glue, ribbon
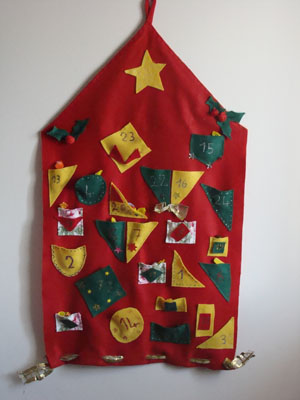
Once you have decided on the shape of the calendar, draw it on a paper pattern first, then place it on the fabric and attach it with pins so that it doesn’t move while you are cutting the fabric with scissors.
To make the house shaped calendar in the picture, you need to cut a rectangular shape, fold the two extremities at the top (shorter side) to obtain a point; secure with glue; fold the bottom edge (opposite shorter side) backwards to obtain a 3 cm hem; use pointed scissors to make holes at regular intervals to feed the ribbon through. If you use a ribbon with wire, the bottom edge will hang well as the ribbon functions as a weight. Alternatively you can feed a wooden stick in the gap.
Cut 24 pouches of different shapes and sizes; attach them with glue and leave to dry.
Decorate with glitter glue and leave to dry.
The calendar is ready to be filled with your favourite treats.
For more interesting Christmas crafts visit the Craft Advent Calendar over at Mummy Do That!


Oh this is FABULOUS! We love advent calenders and this one is brilliant!!
Thanks for sending it to me for Christmas Get Crafty…
Maggy