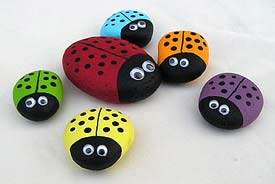
Fun crafts project turned rocks into colourful ladybugs

I found this idea on Kaboose where I often go to find interesting recycling crafts.
To make ladybug rocks is very easy and all you need is smooth, round oval rocks (we have plenty of those!), acrylic paint, 2 wiggle eyes for each ladybug, a black marker, acrylic matt sealer spray and white vinyl glue.
Before you start make sure all the rocks are washed and dry, then paint the rocks in your favourite colour and leave to dry. Apply a second coat of paint especially if you are using light colours. Paint the head with black paint and use a black marker to draw a strait line down the middle and paint the dots on either side of the line applying a lot of paint to the paintbrush. Once the paint is fully dry finish the ladybugs with acrylic sealer. Make sure the seal is dry before you glue on the wiggly eyes.


Your lady bug rocks are gorgeous and such a great idea! I hope it’s okay, I’ve featured them in a rock crafts round-up that I posted today. You can see it here:
http://crafteronabudget.blogspot.com/2012/03/crafts-using-rocks-rock.html
Thank you so much for sharing your cute rocks!