Monday crafts: how to make a fun bookshelf out of cardboard boxes
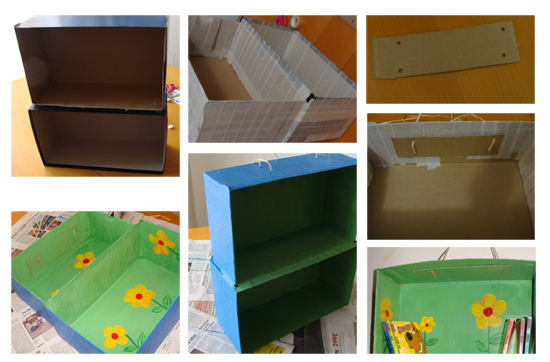
To make these bookshelves you need two shoeboxes of the same size (or as close as possible), masking tape and paint.
1. Take two shoeboxes and place one on top of the other standing on their side.
2. Secure them with adhesive tape and cover the whole surface with masking tape. Masking tape keeps the structure solid as well as being a good base for painting.
3. Cut a rectangle shape out of strong cardboard and make two holes, one on each side; then place the shape inside the top shelf and mark the holes.
 4. Cut the holes on the top shelf and feed some string through to connect the holding rectangle shape and the top shelf together. The string will be used to hang the shelves when finished.
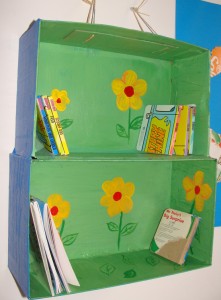
5. Paint as you like. We painted the outside blue and the inside green. In the end we added a few flowery details to brighten it up.
6. Hang using the string. According to the strength of the cardboard used you may place more or less books or other objects.
Happily shared with Kids Get Crafty and Play Academy.


Lovely! Been wanting to make some bookshelves out of cardboard for my little one and I love the flowers on the inside. Very pretty and inspiring to get on with it now!
Though I think I’d use a couple of layers of papier mache (paper + glue out of flour and water on heat) just to make it a bit stronger.
Good idea the paper mache, it takes a little more work but it definitely makes it last longer. I look forward to seeing the result:)
Oh, I love the flowers, they are really cute and brighten it all up! Very nice. We have SO many books. We could do with some extra shelves!!!
Thanks!
Maggy
Those are verry pretty! The flowers are so bright and shiny,and I think I’ll make a few with my daughter for her small horses.Tnx for the idea!
I love the bookshelves! Amazing what can be done with simple cardboard.
Well done!!
B’s book boxes are over flowing so this is a great one for us. Thanks for linking